Introduction to Kotlin for Android development – An Insight
Google, in their recent I/O conference announced that Kotlin would be fully supported for Android development. This gives a choice for the beginners to choose either Java or kotlin for their development track. Looking into the features, Kotlin provides more unique things, and for the same reason, it is getting bigger day by day.
Kotlin is a Statically typed language developed by JetBrains. Simply, a statically typed language is one if the type of a variable is known at compile time. Kotlin comes under this category since it offers some form of type inference, that is nothing but the capability of the system to deduce the data type of a variable. The advantage of Kotlin over Java is that, checking of all kinds will be done by the compiler itself, which usually catches a lot of trivial bugs at a very early stage and helps makes things better.
Kotlin is a fully interoperable language supporting Java, which means you can use Java and even mix Kotlin with java in your code, and all above them it comes with no limitations. Interesting! Some of the apps in the play store such as Basecamp works solely on Kotlin.
Everything is fine! But Why should I use Kotlin when I already have Java with me? Well, the main reason is that it can help you with a number of features such as the elimination of null references, elimination of checked exceptions, and much. It doesn’t make you drop Java, but add some extra features to what you already have about Java. So, it’s worth considering.
Getting things Set Up
Kotlin comes packaged with Android Studio from Version 3.0. If you are using the previous version 2.3.3, you can install Kotlin by navigating to File > Settings > Plugins > Install JetBrains Plugin > Checking for ‘Kotlin’ and hitting ‘install’.
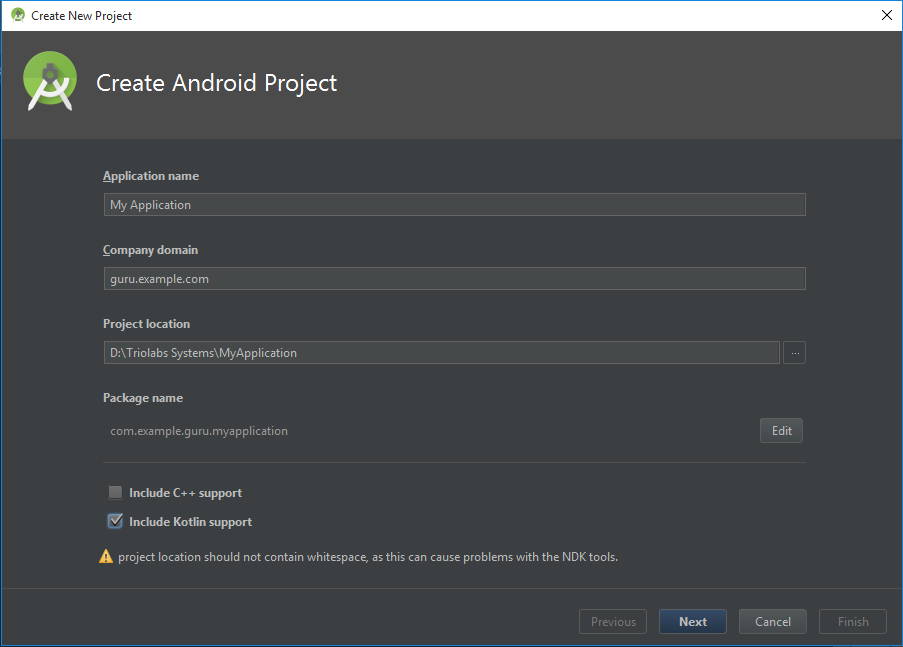
If you use the latest Android Studio version 3.0 or higher, then you will be seeing a new option in the create project menu to include Kotlin support. Simply checking the box allows Kotlin integration in your project with no further steps.
Once you’ve set up a new project, open the MainActivity.java file and do trigger the conversion by simply going to Help > Find Action and then start entering ‘Convert Java File…’. You will get it when you try it.
That’s it! Now your Java code will change to Kotlin. The MainActivity.java now becomes MainActivity.kt, where ‘.kt’ is the extension for Kotlin files.
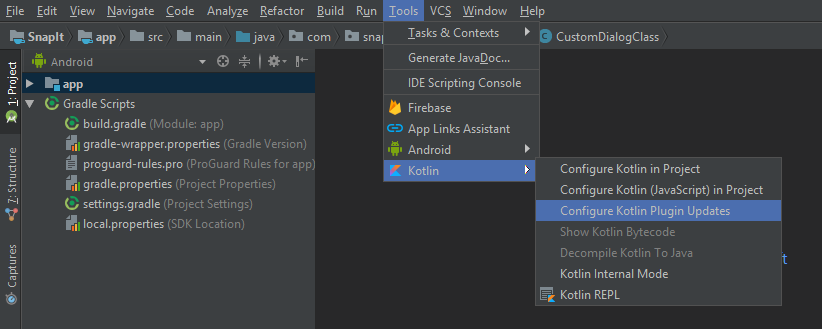
If you are using earlier versions of Android Studio, and installed Kotlin through plugins window, you might need to configure Kotlin by checking down Tools > Kotlin > Configure Kotlin and install the latest available version from there.
If everything went right then you will see some changes in your module’s Gradle file. Just check for the line: apply plugin: ‘kotlin-android’ and a new dependency kotlin-stdlib. Everything is now setup. Just Sync your Gradle and start with Kotlin!
Kotlin vs Java: The difference
In Java you declare classes using the public scope. Here in Kotlin, there is no public keyword. All the classes are public and final by itself.
In Java, we use extends SomeActivity. In Kotlin we won’t use extends either, but we use a colon instead which does the same thing.
|
1 |
public class MainActivity extends AppCompatActivity { } |
becomes
|
1 |
class MainActivity : AppCompatActivity() { } |
The method
|
1 2 |
@Override public void onCreate(Bundle savedInstanceState) { } |
becomes
|
1 |
override fun onCreate(savedInstanceState: Bundle?) { } |
where fun stands for function (which we call as methods in Java).
There is no semicolon in kotlin at the end of statements. For example,
|
1 |
setContentView(R.layout.activity_main); |
becomes
|
1 |
setContentView(R.layout.activity_main) |
To create a string, the syntax is like
|
1 |
var text: String = “Welcome” |
But Kotlin is designed in a way smart enough to find the data types themselves like how python does. So writing the line without specifying the datatype is simply fine.
|
1 |
var text = “Welcome” |
Kotlin simplifies the number of lines of code compared to Java. Let us consider adding an onClickListener to a FloatingActionButton.
|
1 2 3 4 5 6 7 |
FloatingActionButton fabtn = (FloatingActionButton) findViewById(R.id.fabtn); fabtn.setOnClickListener(new View.OnClickListener() { @Override public void onClick(View view) { ... } }); |
and the equivalent code in Kotlin looks like
|
1 2 3 4 |
val fabtn = findViewById(R.id.fabtn) as FloatingActionButton fabtn.setOnClickListener { ... } |
In Kotlin, val is used to create constant values.
There are more binding features in Kotlin like avoiding findViewByID in the codes by adding the kotlin android extensions plugin.
To do this, simply add the below to modules Gradle file.
|
1 |
apply plugin: ‘kotlin-android-extensions’ |
sync the Gradle and add the following to class imports
|
1 |
import kotlinx.android.synthetic.main.<layout>.<viewId> |
For example, let us see with an EditText
activity_main.xml:
|
1 2 3 4 5 6 7 8 9 10 11 12 13 14 15 16 |
<?xml version="1.0" encoding="utf-8"?> <RelativeLayout xmlns:android="http://schemas.android.com/apk/res/android" xmlns:tools="http://schemas.android.com/tools" android:id="@+id/activity_main" android:layout_width="match_parent" android:layout_height="match_parent" tools:context="com.triolabs.myKotlin.MainActivity"> <EditText android:id="@+id/MyEditText" android:layout_width="wrap_content" android:layout_height="wrap_content" /> </RelativeLayout> |
You can then import the EditText into your MainActivity.kt
MainActivity.kt:
|
1 2 3 4 5 6 7 8 9 10 11 12 |
import android.support.v7.app.AppCompatActivity import android.os.Bundle import kotlinx.android.synthetic.main.activity_main.MyEditText class MainActivity : AppCompatActivity() { override fun onCreate(savedInstanceState: Bundle?) { super.onCreate(savedInstanceState) setContentView(R.layout.activity_main) MyEditText.setText("This is an EditText") } } |
It’s much simpler and the code is more human readable. Isn’t it? The lesser boilerplates makes it a lot cooler than it actually seems.